Love to Laugh and Learn

Fun and interesting learning activities to do with the children in your life

  • Home
  • About Me
  • Attractions
  • Recipes
  • Privacy Policy

Review: Conner Prairie on President’s Day (with a 2 yr old)

February 20, 2012 by Mama Carmody 11 Comments

It has been years since I have made a trip to Conner Prairie. I have always loved that place but since our finances have been tight over the last few years I just haven’t been able to go.

Today was President’s Day and Conner Prairie was offering free admission. I had two objectives in going today; first of all, I wondered how crowded and crazy it would be on a free admission day and secondly to see what kind of activities they had for the very young child.

So on the first objective:

How Crazy Was It On A Free Admission Day

There were definitely a lot of people taking advantage of the free admission but we didn’t really have any trouble getting around. The Science Lab was way too crowded for us to get into and, from what I have seen on Conner Prairie’s website, I thought it might be a little advanced for a two year old so we didn’t attempt getting in there. We were able to get into the Discovery Station. It was a little crowded in there so we didn’t let the two year old out of the stroller. There were so many interesting things for him to do though. We decided we would have to go back on a regular day when it might not be as crowded so he could get down and run around. One of the things in the Discovery Station was a General Store that children could play inside.

Conner Prairie: General Store

There were several tables set up with toys on them such as a barn and legos. All the tables were full so we moved on to another room…but we will be back.

Several activities were going on out in the hallway. There were craft tables with children making Abraham Lincoln masks and hats. There was a work table with several kinds of tools on it but we didn’t make it around to there. It was pretty well surrounded by children. There was a great dress up area with clothes for all ages. I saw kids and moms dressing up and everyone was having fun.

Conner Prairie: Dress-up

We were told that there were more activities going on upstairs so we climbed the stairs (unaware that there was an elevator) and found it wasn’t as crowded upstairs. There was a room with all kinds of old time toys and games set up. Since it wasn’t as crowded up there we let the two year old out of the stroller to run around. I will give more details on the things going on upstairs in a little bit when I cover what kind of activities were available for really young children.

After playing upstairs for a while we decided to go outside to see what was happening out there. First we headed to the Featherston Barn to join the birthday party for George Washington. We received a hot chocolate and enjoyed some fiddle playing and dancing.

Conner Prairie: Fiddler


Conner Prairie: Barn Dancing

All ages were having fun dancing.

After George Washington’s Birthday party we headed over to the Lenape Indian Camp. I believe this was one of the 2 year old’s favorite areas….more details coming up.

So in conclusion to this segment, some areas were a little crowded but not so crowded that I wouldn’t go back on another one of their free admission days. Everywhere we went was well staffed and everyone was very cheerful and helpful.

Now the second objective:

Activities for the Very Young

As stated above, the Discovery Station had several things that a young child would enjoy but the room was really full today. We definitely want to go back on a day that will be less crowded so the two year old can run around and play with all of the interesting things in that area.

All ages were enjoying the craft table that was in the hallway. Although the very young ones weren’t making the Abraham Lincoln craft they were enjoying coloring and drawing. There was an adorable little girl having fun at the dress-up area.

Conner Prairie: Little girl in dress-up area

As I stated earlier, it was less crowded upstairs so we let the 2 year old out of the stroller to play. He enjoyed playing bean bag toss…

Conner Prairie: Bean Bag Toss

…or should I say, 2 year old stuff the bean bag.

Conner Prairie: 2 yr old version of Bean Bag Toss

That kept him occupied for several minutes. We then went over to a table that had slate boards (chalkboards) and soapstones. Soapstones were what they used to write on the slate boards. We decided we liked the soapstones so much better than the modern chalk that children use today. The soapstones don’t leave that big chalky mess. The 2 year old really enjoyed drawing and we liked the fact that he didn’t have white chalk dust all over himself once he finished.

I believe the 2 year old had the most fun outside. He was able to walk through the basket on the bottom of the large balloon. It wasn’t going up during the time we were there but he didn’t seem to mind. He ran around the basket several times. There was a cute little imitation balloon that he, his brother and mother had their picture taken it. It was a little dark but really cute.

Conner Prairie: Pretend Balloon Ride

After the balloon we headed out to the Featherston Barn for the birthday party. The 2 year old loved the music and the dancing. The pictures are a little blurry because he kept dancing around in circles.

Conner Prairie: Dancing to the Fiddler
Conner Prairie: Dancing in Barn
Conner Prairie: Dancing in Barn (2)

After he was done dancing we headed out to the Lenape Camp. On the way we got to stop and look at a goat. The two year old wanted to kiss the goat but thank goodness the slats in the fence were too small.

Conner Prairie: Goat

There were several cabins at the Lenape Camp. A couple of them were open but they were totally full of people. We were able to step into the doorway of one but we didn’t stay long. One of the cabins was closed up so we had a little fun with the two year old. His mom encouraged him to walk up the steps so she could get a cute picture of him.

Conner Prairie: Cabin

She then encouraged him to knock on the door and say, “Is anybody home?”

Conner Prairie: Is anybody home?

No one was home….

Conner Prairie: Nobody’s Home

…or so we thought…

Ooops…Someone was Home

…I guess we were wrong…somebody came out…

Conner Prairie: He Left

…but then he left. We were able to go watch him shoot his rifle after that.

I believe the two year old had the most fun in the Lenape Indian Hut. He spent a lot of time running in and out of there and climbing on the benches.

Conner Prairie: Lenape Indian Hut
Conner Prairie: Lenape Indian Hut (2)
Conner Prairie: Lenape Indian Hut (3)

We had a hard time getting him out of there. Every time we would ask him if he was ready to go he would turn around and run back inside.

I would have to conclude that there are plenty of fun things for very young children to enjoy. A two year old may be a little young to explain the history of what Conner Prairie is about but the idea of it being a simpler time; a time with no television, no video games, a time when children had to use their imagination and make games out of every day items, is right up a two year old’s alley.

Conner Prairie: Just Having Fun

When all was said and done, we had a wonderful day! Lots of laughs and fun getting to run around in the sunshine on a not-so-horribly cold February day in Indiana.

Related Posts:

Review: Conner Prairie with Young Children
Attractions
Review: Radio Disney Event, Indianapolis 2012
Filed Under: Reviews Tagged With: children, Conner Prairie, Conner Prairie Interactive History Park, educational activities, family friendly, family friendly activities, fun learning, learn, learning, learning fun, love to laugh and learn, making learning fun

The Christmas Star

December 14, 2011 by Mama Carmody 13 Comments

The Christmas Star


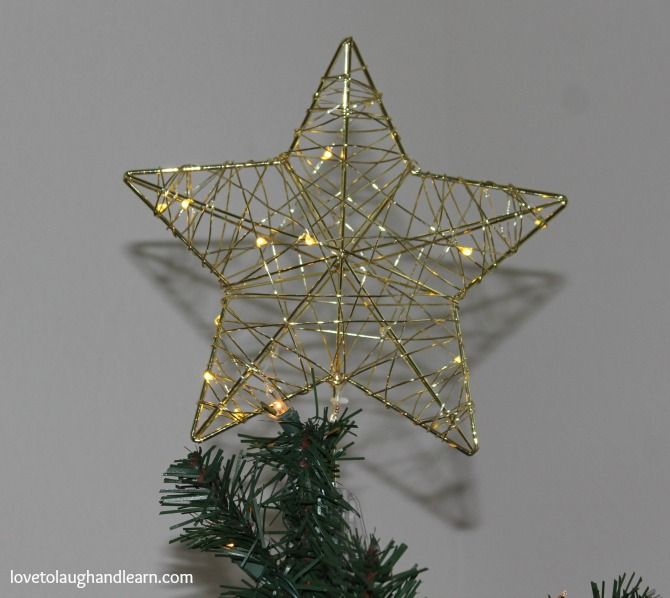
Christmas Star

The Christmas Star: A heavenly sign that the wise men were able to follow to find the birth place of Jesus

“Teach the children that the star is the heavenly sign of promise,” he said. “God sent a Savior to the world and the star was the sign of that promise being fulfilled. The countless shining stars in the heavens, one star for each person on earth, represents the hope of all mankind.” (A quote from the story, Teach the Children the True Meaning of Christmas)

Matthew 2:2b “We saw His star when it rose and have come
to worship Him.”

Matthew 2:9 “After they had heard the king, they went on their way,
and the star they had seen when it rose went ahead of them
until it stopped over the place where the child was.”

The Christmas Star and the Christmas Angel would take turns setting on the top of our Christmas tree. To me, both are important because each one announced the birth of God’s Son. Here are some different activities to use during this blessed holiday season as you remember the real reason for the season.

Finger Play

A Shining Star
(Action Rhyme)

On the very first Christmas night,
(Put hands together; lay head on hands as if sleeping.)
A wondrous star shone big and bright.
(Hold hands above head; move fingers like stars shining.)
It marked the spot where the baby lay,
(Pretend to rock baby.)
So kings and shepherds could come to pray.
(Fold hands and kneel.)
– Original Author Unknown

Crafts

Cinnamon Ornaments
Cinnamon ornaments were something that I made with my children when they were younger. Between Thanksgiving and Christmas we would make ornaments to give to family and friends as presents. They were always a big hit. This is a wonderful gift that also makes your house smell delicious. I am using the recipe from allrecipes.com because I have no idea where my recipe has gone.

Ingredients
1 cup ground cinnamon
1 tablespoon ground cloves
1 tablespoon ground nutmeg
3/4 cup applesauce
2 tablespoons glue

Directions
1. In a medium bowl, stir together the cinnamon, cloves, and nutmeg. Mix in the applesauce and glue. Work the mixture with your hands 2 to 3 minutes to form a ball. If mixture is too wet, add more cinnamon. If mixture is too dry, add more applesauce.
2. Lightly dust a clean surface with cinnamon. Roll out the dough to 1/4 inch thickness. Cut out shapes with cookie cutters, and use a toothpick or straw to make a hole at the top for hanging with a ribbon.
3. Dry in a slow oven 200 degrees F (100 degrees C) for several hours, or air dry in a sunny spot for 4 or 5 days. When dry, decorate with gingham and/ or ribbon.

Popsicle Star
I have created a lot of popsicle crafts in my time and enjoyed every one. This would be a good one if you have children of different ages. The older ones can create the stars and the younger ones can paint them and add sparkles or buttons to give it a little extra “shine”. Although I’m sure that some of the older children will want to add their own artistic touches to the stars. (This craft came from kaboose.com)

Materials Needed:
• 10 Popsicle sticks, coloured or plain
• Hot glue gun or ordinary glue
• Length of fishing line
• Paint or markers, glitter, etc.

Instructions:
1. Draw up a template of a star using craft sticks.
2. Place one stick inside one line then add some glue to the top. Position second stick on this.
3. Continue step 2 until all 10 sticks are in place.
4. Attach some fishing line to one point for hanging.
5. Decorate as desired. Using the colors yellow, gold, red and green make for a great Christmas star. Try different colors for theme parties, or use glow-in-the-dark paint for a magical bedroom at night.

Homemade Paper Stars
I recently found this ornament on the Family Fun website. I have never done this craft before but I can’t wait until my great-niece, nephews and grandkids are old enough to do this with them. It looks like it could get messy but sometimes messy is half the fun.

Materials Needed:
• 3 (9- by 12-inch) sheets of construction paper
• Blender
• Very hot water
• Folded cloth towel
• Plate
• 3-inch star-shaped cookie cutter
• Sieve
• Glitter
• Rag
• Baking sheet
• Ribbon loops

Instructions:
1. Tear 3 (9- by 12-inch) sheets of construction paper into small pieces, about the size of a domino, and place them in a blender. Pour in about 1 1/2 cups of very hot water and let it sit for 5 minutes. Meanwhile put a folded cloth towel on a plate, add a paper towel and top with a 3-inch star-shaped cookie cutter.
2. Heat the oven to 200 degrees. Pulse the blender until the mix is pulpy, about 30 seconds. Ina sieve set over the sink, drain the pulp, then spoon some into the cookie cutter to the top, taking care to fill the points. Sprinkle with glitter. Use a rag to press the pulp down into the cookie cutter until most of the water is gone, then gently push the star out onto a baking sheet. Repeat to make two more stars.
3. Bake them for 2 hours or until the moisture has evaporated (they should be firm and lightweight). Let the stars cool, the glue ribbon loops to the backs for hanging. Makes 3 stars.

Snacks

Here are a couple of healthier alternatives to cookies, as you are making crafts and reading books together.

Crispy Cheese Stars from FamilyFun.com
I love cheese so these look extra yummy to me.

Ingredients
• Flour tortillas
• Sliced cheese (cheddar, provolone, or mozzarella)
• Chili powder or paprika

Instructions:
1. Heat the oven to 350º. Use the larger cookie cutter to cut out stars from flour tortillas (about 5 per 10-inch tortilla). It’s easy for kids to do if you use a rolling pin to roll back and forth over the cutter. Bake the stars on a foil-covered cookie sheet for 5 minutes.
2. Use the smaller cookie cutter to cut out an equal number of cheese stars from the sliced cheese and place them atop the tortilla ones. Bake the stars for 2 more minutes or so until the cheese melts.
3. Sprinkle the stars with chili powder or paprika and let them cool before serving.

Star Fruit – A little fruit with your cheese is always a good thing.

Story Time

The Christmas Star Book & Advent Calendar by Marcus Pfister
Reading Level: Ages 4 – 8
Here is another great book from the author of “The Rainbow Fish”. The sparkling silver stars add so much to the illustrations. A wonderful story of how the shepherds, the Wise Men and even the animals followed the star to Bethlehem, where they welcomed the Holy Child.

Small Camel Follows the Star by Rachel W.N. Brown
Reading Level: Ages 3 to 8 yrs old
This is a sweet story of Small Camel’s first trip across the desert. It is a special trip to follow the, much sought after, star that leads the wise men to Bethlehem. Under the star they find the young King, in a very simple house. I love that this story in Biblically correct, in the fact that the wise men find the baby King, a few months later, in a house. (Matthew 2: 1- 12)

Song of the Stars: A Christmas Story
by Sally Lloyd-Jones
Reading Level: Ages 4 – 8
I love the way this story describes how all of creation was anticipating the arrival of our Savior. It talks of how the trees, the flowers and the animals were crying out, “It’s time. It’s time,” as the birth of Jesus drew near. This was a very different way to look at the Nativity scene. No shepherd, no wise men but all of creation celebrating: “Heaven’s Son sleeping under the stars that He made.”

Related Posts:

The Santa Claus Debate
The True Meaning of Christmas
Christmas Angels to Laugh and Learn With
Love to Learn About the Nativity
Love to Learn the Meaning of Candy Canes for Christmas
Review – Christmas on Monument Circle, Indianapolis

Filed Under: Christmas, Learning Activities Tagged With: christian, christmas, Christmas star, Christmas symbols, December, family friendly, family friendly activities, God, holiday, holidays, Jesus, love to laugh and learn, making learning fun, spiritual, star

Christmas Angels to Laugh and Learn With

December 11, 2011 by Mama Carmody 28 Comments

Christmas Angels to Laugh and Learn With


Christmas Angels – Appeared to shepherds to announce the birth of Christ

Luke 2: 8-10 “And there were shepherds living out in the fields nearby, keeping watch over their flocks at night. An angel of the Lord appeared to them, and the glory of the Lord shone around them, and they were terrified. But the angel said to them, ‘Do not be afraid. I bring you good news that will cause great joy for all the people.’”

The Christmas Angels appeared in the sky, over the fields near Bethlehem. They announced the birth of Christ. You will usually find either an angel or a star on the top of a Christmas tree because of the importance of their appearances in the sky.

Following are some activities to do in relation to the angels. I hope you and the children in your life enjoy them.

Coloring Pages

If your child likes to color, here are a couple of free coloring pages from about.com
Angel coloring page
Cheerful Angel

Crafts:

Paper Plate Angels
I just had to share these adorable little angels I found online. They are made from paper plates. Click on Paper Plate Angels to go to the link. The one thing that I didn’t see mentioned, in the instructions, was the size of the paper plate. I used a small 6-inch sized plate. It made an adorable little angel. I was very happy with the size. If you want to put it on top of a large Christmas tree, I would use a bigger paper plate.

Christmas Angels from a paper plate.

Hand Print Angel
I have used this craft in my preschool classrooms. The parents always adore them. I love hand print crafts because they become a piece of family history. Be sure to always date the back of any special craft your child does and put their name on it. It will make a great conversation piece as you decorate for Christmas, in later years.

1) Trace the child’s hand three times. Have them keep their fingers together. Don’t spread them out like a fan.
2) Cut out the hand prints.
3) Use one hand print as the body of the angel and the other two as the wings. The wings will look the best if you be sure to place the hand prints so that the thumbs are facing down. (Refer to picture)

Christmas Angels made from hand prints

4) You can either cut out a circle to use for the head or you can use a picture of your child’s head. They both make nice looking angels.
5) As a final touch, (which I forgot to add to one of my samples) you can make a halo out of a silver or gold pipe cleaner or make one out of a piece of aluminum foil. To make the halo out of aluminum foil, cut off an 8 inch by 1 inch piece of aluminum foil. Gently squish and twist it. Then form it into a circle and tape it to the back of the angel’s head.

Christmas Angels from Handprint

Story Time

  “The Christmas Angel” by Hans Wilhelm
Reading Level: Ages 3 – 8
Your child will fall in love with this adorable little angel. All he wants to do is to travel from heaven down to earth; so he can sing his special song to the Son of God. But his wings are too small and he is not allowed to make the trip. Find out what happens to the scared little angel after his accidental fall off of a cloud.

“An Angel Came to Nazareth” by Anthony Knott
Reading Level: Ages 5 and up
This is a very interesting poem of an angel who came to a stable in Nazareth. The angel asks a camel, a donkey, a horse and an ox to pick which one of the four travelers they would carry. One of them would end up carrying “the greatest of them all.” Can you guess, before ever reading the poem, which animal carried “the greatest of them all”?

Please take the time to stop by my Facebook page, Love to Laugh and Learn, and tell me about any of the crafts or books that you shared with your children. I would love to see pictures too.

Related Posts:

The Santa Claus Debate
The True Meaning of Christmas
The Christmas Star
Love to Learn the Meaning of Candy Canes for Christmas
Review – Christmas on Monument Circle, Indianapolis

Save

Filed Under: Christmas, Holidays Tagged With: angels, christian, christmas, Christmas angels, Christmas symbols, December, family friendly, family friendly activities, fun learning, God, holiday, holidays, Jesus, love to laugh and learn, spiritual

Thanksgiving Learning Activities

November 19, 2011 by Mama Carmody 42 Comments

Thanksgiving Learning Activities


“Give thanks to the Lord for He is good.
His loves endures forever.”
Psalm 118:1

Thanksgiving learning activities include a little history. There are several fun learning activities listed below to do while you are gathered together to celebrate this special holiday. I would really enjoy hearing about the fun you had creating pilgrims hats or reading any of the recommended books, so please leave a comment below. If you have pictures to share please post them on the Love to Laugh and Learn Facebook page.

Content:

Crafts
Hand and Foot Turkey Craft
Native American Indian Headband
Native American Indian Vest
Pilgrim Hat for Boys
Pilgrim Hat for Girls
Music
Reading
Toys

Toys

I love using “special” toys to get across a lesson. I had toys that were only gotten out occasionally for a specific lesson or time of year. These toys were not just left in the toy box or in the classroom. I kept them put up in special containers and only got them out at certain times and then they were put back up again. Following is a list of things that I used, in the classroom or at home, for the children to use to learn about the first Thanksgiving.

Horse Costume – I probably wouldn’t have called it a costume but that is what it is called on Amazon.com. It is a plush style horse. The child steps through the center and pulls straps, like suspenders, up over their shoulders. They used the horses when pretending to be Native American Indians. A stick horse would work well too.

Playmobil Native American Indians – Playmobil is made up of a lot of tiny parts, which is another reason why I kept them in a special container and only got them out for specific lessons. The children loved the Playmobil pieces and they promote fine motor skills.

Teepee Tent – A teepee tent adds a lot of fun to the children’s make-believe play. I purchased a big black plastic “cauldron” after Halloween to go with the teepee.

Dress-up Clothes Box – Both boys and girls love playing with dress up clothes. After Halloween is a great time to get items for your dress-up box. You can purchase costumes at very low prices. Be sure to pick up some Pilgrim and Native American Indian costumes to use at Thanksgiving time. There are some great dress-up items that you and your child can make together to add to the dress-up box. I will cover some of those in the craft section.

(top)

Crafts

Thanksgiving Learning Activities: Have fun making turkeys from your child’s hands and feet.

Hand and Foot Turkey Craft

Materials Needed:
Construction Paper; brown, red, orange and yellow
Pencil
Scissors
Glue stick
Wiggly eyes (optional)

This is a fun craft that I got from enchantedlearning.com. This would be a good craft to first do with your child when they are two or three years old. You can then make a new “hand and foot turkey” each year and see how much your child has grown. They will make cute decorations for each Thanksgiving. Be sure to put your child’s name and the date on the back of the turkey. I would take it and have it laminated to help preserve it.

Native American Indian Vest

Materials Needed:
Large brown paper grocery bag
Scissors
Crayons or markers

These vests are very simple and a lot of fun. Cut the bag up the middle of one of the wide sides. Cut a neck hole out of the bottom of the bag and arm holes out of the narrow sides of the bag. Now set your child loose with some crayons or markers to decorate their vest. For older children, show them some Native American symbols. They might enjoy drawing them on their vest.

Native American Indian Headband

Materials Needed:
Brown poster board or cardstock
Construction paper; brown, orange, yellow, red
Feathers (optional)
Scissors
Glue stick
Tape or stapler

I use poster board or cardstock for the headband but I have also heard of people using a paper bag. You will want to cut a 2 inch wide strip that is long enough to wrap around the child’s head. Make sure to cut it an inch or two longer than the width of the child’s head so that you can overlap the ends and staple or tape them together. (Hint: If you staple the ends together, staple from the inside out; so that the folded part of the staple is on the outside. This will keep the staple from getting caught in the child’s hair.) Cut feather shapes out of some colored construction paper or purchase feathers at the craft store and attach them to the band.

Pilgrim Hat For Girls

Materials Needed:
12” x 18” white construction paper
White Ribbon or yarn
Scissors
Stapler and/or glue stick

This hat is enjoyed by little girls of all ages but there isn’t a whole lot for a real young child to do in helping make the hat. Once your child is old enough to use scissors and a stapler they will be able to contribute a little more in the making of this project. If you are doing this craft for a younger child I would add a step and let them use a glue stick and apply some glue to the flaps that will overlap on the back of the hat. I would still staple the flaps to give them extra holding power. As I stated earlier, staple from the inside out; so that the folded part of the staple is on the outside. This will keep the staple from getting caught in the child’s hair.

About.com has great instructions for the girl’s pilgrim hat along with a pattern so I’m going to give you their link to access the directions: Pilgrim Hat for Girls

Pilgrim Hat for Boys

Materials Needed:
black poster board or cardstock
Construction paper: black, white and yellow or gold

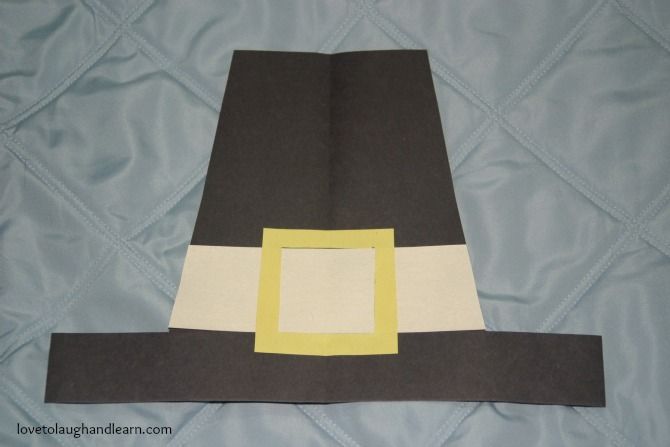
Thanksgiving Learning Activities: Creating Boy’s Pilgrim Hat

1) Cut a 2” wide headband, out of black poster board or cardstock, that is slightly larger than your child’s head.
2) Fold a 12″x 9″ piece of black construction paper in half. Draw half of a hat on the folded edge of the paper. I used a ruler to help me make straight lines. Make the brim 2″ wide.
3) Cut a 2” wide strip from a piece of white construction paper. Glue it just above the brim of the hat.
4) Cut 2 ½” x 2 ½” square from a yellow piece of construction paper. Cut a 2” by 2” square out of the center of the square. I again cut the square on a fold to make it easier to cut the center out.
5) Glue of staple the finished hat to the headband.
6) Tape or staple the headband to fit around your child’s head. Cut off any excess poster board.

Thanksgiving Learning Activities: Pilgrim’s Hat

(top)

Music

10 Little Indians

One little, two little, three little Indians
Four little, five little, six little Indians
Seven little, eight little, nine little Indians
Ten little Indian boys.

Ten little, nine little, eight little Indians
Seven little, six little, five little Indians
Four little, three little, two little Indians
One little Indian boy.

Gobble, Gobble
(Sung to “If you’re Happy & You Know It”)

“Gobble, gobble, gobble, gobble”, says the bird.
Mr. Turkey gobble-gobbles
And his head goes wobble-wobble
“Gobble, gobble, gobble, gobble”, says the bird.

Give Thanks to the Lord – Hide ‘em in Your Heart, Vol. 2 by Steve Green

(top)

Story Time

If You Were At The First Thanksgiving by Anne Kamma
Reading Level: Ages 7 and up
This is one of my favorite Thanksgiving books for teaching the history of the holiday. This book contains a whole lot of interesting information about the first Thanksgiving. It is well written. Although it is recommended for ages 7 and up, I read sections of it to my pre-kindergarten classes. It is written in a question/answer format which helps break up all the information into small “bite sized” pieces. This format makes it easy to cover a couple questions at a time or several if your child is really interested.

The Night Before Thanksgiving by Natasha Wing
Reading Level: Ages 4 and up
As the title might suggest, this book is written in the same style as Twas the Night Before Christmas. It is written in as amusing fashion of a family’s Thanksgiving Day from a child’s point of view. Lots of smile will ensue when sharing this book with your child.

‘Twas the Night Before Thanksgiving by Dav Pilkey
Reading Level: (officially) Ages 3 and up (but my recommendation would be 5 and up)
This is a quirky little story about a classroom of children that take a field trip to a turkey farm, the night before Thanksgiving. All is well until someone finds an axe and asks what it’s for. As you can imagine there were many tears over the realization of what was going to happen to their feathery friends. When the teacher and Farmer Mack Nuggett return from getting some water, to hopefully calm the children, they find “the children were calmer (and mysteriously fatter)”. You will need to read the story to find out what transpires but I will tell you that it is a happy ending. I wouldn’t recommend this for really young children, but once they start getting old enough to understand where their food comes from, it would be appropriate. Although this sounds like a dark tale, it is very light hearted. It is written in rhyme and the same style as “‘Twas the Night Before Christmas” It is one of my favorite fun Thanksgiving books. Each year I read it to my pre-kindergarten classes. I never had any bad reactions from the children (or the parents) just smiles and giggles.

(top)

Related Posts:

Thanksgiving Fun with Turkeys
A is for Apple: You Can Learn More Than Your ABC’s from Apples
Pumpkins are Orange; and Other Learning Concepts

Filed Under: Holidays, Thanksgiving Tagged With: educational activities, family friendly activities, fun learning, learn, learning, learning concepts, learning fun, learning opportunities, lessons, making learning fun, Thanksgiving, Thanksgiving learning activities

Learning Should Be Fun

October 7, 2011 by Mama Carmody 22 Comments

Learning Should Be Fun


“A joyful heart is good medicine…”  -Proverbs 17:22

I love exposing children to new learning opportunities. I believe that learning should be fun and hands-on.

Children’s learning activities should be enjoyable and interesting. Repetition of a concept will help secure it in the mind of the learner. I do not suggest repetition as in using flash cards over and over in some sort of old school torture. I mean using the same concepts in several different learning environments.

I share, through this blog, many fun learning opportunities that you can experience with the children in your life. You will find detailed ideas as well as general concepts that you can mix and match in different learning situations.

At first most of my concepts will be for younger children. Although, I did teach 4th, 5th and 6th graders for a couple of summers, most of my expertise comes with young children.

Along with the different learning concepts, I want to research and post different attractions with family friendly activities that are going on in our community.  At first these activities will be centered around Indianapolis because that is where I currently reside but my dream is to expand the resources well past Indiana.  Although I will be posting specific activities that are going on in the Indianapolis area, I will also suggest general activities that make good learning opportunities that you can look for in your area.

My real vision for this blog is that it can help families have fun learning together but there will be information that will be interesting to teachers too. I am so excited about having this opportunity to share with you.

Most Sincerely,

Mama Carmody

Related Posts:

When Do Children Start Learning
The Lessons – Overview
Colors – Overview
Shapes – Overview
Fun with Music – Overview

Filed Under: Articles Tagged With: attractions, family friendly activities, learn, learning, learning opportunities

  • « Previous Page
  • 1
  • …
  • 9
  • 10
  • 11

Don’t Miss This Great Book

Categories

  • Articles
  • Attractions and Events
  • Autumn/Fall
  • Children's Books
  • Christmas
  • Coloring Pages
  • Colors
  • Community Helpers
  • Contest
  • Cooking with Kids
  • eBundles
  • Free Printables
  • Gardening
  • Halloween
  • Holidays
  • Learning Activities
  • Music
  • Reviews
  • Sensory Bins
  • Shapes
  • Thanksgiving
  • Uncategorized

Follow Me on Bloglovin

Follow on Bloglovin

Recent Posts

  • Yes, You Can Eat Raw Pumpkin! Try My Fall Harvest Fruit Salad
  • Zombie Zapper Brain Boost Smoothie
  • Learning Fun at Disney: The Importance of Imagination
  • Learning Fun at Disney: Manners
  • How to Eat A Pumpkin: A Lesson From a 3 Year Old
  • How to Eat a Pumpkin, Part 2
  • Pumpkins are Orange; and Other Learning Concepts
  • Love to Laugh and Learn at the Apple Orchard

Check This Out

Holiday Toy List – STEM Toys

Books

US Family Guide

USFamilyGuide.com

Recent Comments

  • Mama Carmody on Your Favorite Childhood Book
  • Lisa Smiley on Your Favorite Childhood Book
  • Harlow's Harvest on Eggs in a Nest: Cooking with Kids

Copyright © 2026 · Lifestyle Pro Theme on Genesis Framework · WordPress · Log in