Learning Activities for the Color Yellow
with free printable
Following are some fun learning activities for the color yellow. Find your yellow shirt, put on a big smile and have fun helping your child learn about the color yellow.
Content:
Clothing
Toys
Craft:
Yellow Daffodil
Finger Play
Snacks
Story Time
Related Posts
Clothing
So by now you know where I’m going, right? Help your child find their yellow pieces of clothing and let them help you find your yellow clothing. Get dressed up and ready for Yellow Day.
(top)
Toys
Your child is probably getting the idea of what to do on a special color day. Have them help you go through their toys and find the yellow ones to play with. What can you find?…a yellow truck, Big Bird from Sesame Street, a yellow ball?
(top)
Craft Time
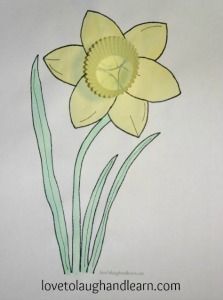
Yellow Daffodil
Materials Needed:
Daffodil Craft Page – click on thumbnail to access the printable craft page
Yellow crayons, markers or paint *
*
Green crayons, markers or paint
Yellow mini muffin liner
Glue or glue stick
* You can make your own watercolors by mixing a a couple of drops of food coloring with a little water. (This is what I did for my sample.)
This is a fairly simple craft activity but it is so cute. It is a great project for the spring or to give as a homemade Mother’s Day gift.
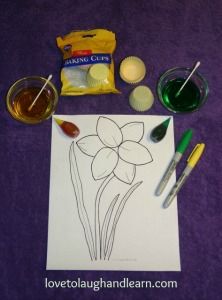
Just print the picture, color or paint it and then glue the mini muffin cup to the center of the flower. Presto Chango! You have a beautiful spring flower.
(top)
Finger Play
Five Little Daffodils
One little daffodil had nothing much to do,
(hold up on finger)
Out popped another one, then there were two.
(hold up two fingers)
Two little daffodils were smiling at a bee,
(point to mouth and smile)
Out popped another one, then there were three.
(hold up three fingers)
Three little daffodils were growing by the door,
(slowly raise arms up above head like growing toward the sun)
Out popped another one, then there were four.
(hold up four fingers)
Four little daffodils were glad to be alive,
(clap hands and smile)
Out popped another one, then there were five.
(hold up five fingers)
Five little daffodils were wearing golden crowns,
(act like putting crown on head)
They danced in the breeze in green satin gowns.
(sway and dance around)
– Author Unknown
(top)
Yellow Foods for snack or meal time
Bananas, yellow pears, cornbread, yellow peppers, yellow tomatoes, corn,
lemons, lemonade, the yolk out of a hard boiled egg
(top)
Story Time
In My New Yellow Shirt
by Eileen Spinelli

Reading Level: Ages 2 and up
What seems like a plain yellow shirt leads to a lot of fun use of a little boy’s imagination. He becomes a duck, a taxi, a lazy caterpillar and several other things. This book inspired the two crafts that I listed in this lesson. Have fun enjoying the book together and then take time to make a craft.
The Yellow Tutu
by Kirsten Bramsen

Reading Level: Ages 3 and up
Here is another adorable child with a big imagination. Margo decides to wear her new yellow tutu in a different way. It makes her so happy as she pretends to be many things…that is, she is happy until she reaches school where she isn’t treated very well by the other children. But her friend, Pearl, comes to the rescue; as friends often do.
The Little Yellow Leaf
by Carin Berger

Reading Level: Ages 3 and up
This makes a great story to read, in the fall, as the leaves start falling down. The one little yellow leaf isn’t ready to let go of the tree even though it’s the only leaf left around…or is it?
Related Posts
A is for Apple: You Can Learn More Than Your ABC’s from Apples
Pumpkins are Orange; and Other Learning Concepts
Learning Activities for the Color Red
Learning Activities for the Color Blue
Learning Activities for the Color Green
Learning Activities for the Color Purple
Learning Activities for the Color Orange