Doctors: Love to Learn About Community Helpers
with free printables

I’m going to start my posts, on Community Helpers, with doctors. Children spend a lot of time with doctors, starting at birth. They need to realize that doctors are their friends and are just helping them to stay healthy. Don’t lie to your child about getting shots, then not only will they be afraid of the doctor but they won’t trust you either. Let them know it will hurt a little bit but the hurt doesn’t last long and shots are to keep them from getting sick.
I always like to start my learning activities with a book. I have listed a few, in the Story Time section, for you to choose from. If you have another book, that you really like, please share it with me.
Below you will also find a craft and some ideas for pretend play. Be sure to enjoy this time of exploration and learning with your child.
Content:
Playtime
Fun Sheet
Craft
Story Time
Related Posts
Acknowledgements
Playtime
Does your child have a toy doctor’s kit to play with? If not, purchase some band-aids, gauze, medical tape and some wipes at the Dollar Tree (or whatever inexpensive store you have). Even if your child does have a toy doctor’s kit it would be fun to occasionally give them some real supplies to play with. You might even be able to find an inexpensive thermometer (not the glass kind) that would be safe for them to play with. Bring out the dolls and have fun making them feel better. Your child may even want to fix an “ouchie” that you have.
Dress up is another fun way to explore the world of doctors. Dress up is fun for boys and girls alike. I like to look for costumes after Halloween. You can find them really cheap.
Fun Sheet
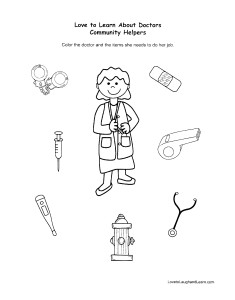
I have created a fun sheet to do with your child. Have your child color the doctor and then color only the items that the doctor would use. Don’t color the items that the doctor would not use.
Click on the picture to get the downloadable fun sheet.
The fun sheet is a great way for your child to develop their fine motor skills, as they color. They will learn to follow directions and will also reinforce what they have learned about doctors.
Craft
Doctor’s Bag

Materials Needed:
Template for Doctor’s Bag craft
Black or white construction paper
cotton swabs
band aid
cotton ball
gauze
glue
tape
crayons or markers
scissors
Instructions:
1. Print the template for the Doctor’s Bag craft
2. Cut out the pieces.
3. Choose whether you want to make a black doctor’s bag or a white one.
4. I like to use the extra large pieces of construction paper. If you do use that size, then fold the paper in half. Place the template of the doctor’s bag onto the construction paper, with the bottom of the bag on the fold. If you use regular size paper, then cut out 2 of the bags and then tape or staple them together at the bottom.
5. Trace and then cut out the bag.

6. Have your child color the stethoscope, thermometer and needle.
7. Now glue or tape your items inside the doctor’s bag. Don’t forget your cotton ball, cotton swabs, gauze and band aid.

I also cut out and glued the white cross from the template to the outside of my doctor’s bag.
8. Discuss with your child what other items a doctor might have in his bag.

Story Time

 A Day in a Life of a Doctor (DK Readers, Level 1) by Linda Hayward
Reading Level: Ages 4 – 7 yrs old
Follow Doctor Baker through her day. She has to go to work early because of a little girl that is very sick. You will get to see and hear about the different instruments the doctor uses. She not only has to take care of patients at her doctor’s office but she also has patients at the hospital that she has to check on. A doctor’s day can be very long and busy but they like being able to help people feel better.

 Doctors (Community Helpers) by Dee Ready
Reading Level: Ages 4 and up
This is a great book to introduce your child to the responsibilities of a doctor. The illustrations are actual pictures of doctors doing their many jobs. The text is simple; just a few clear sentences to each illustration. Once you share this book with your child, they will have a better understanding of what doctors do and the things they need to perform their jobs.
Tools We Use: Doctors (BookWorms) by Dana Meachen Rau
Reading Level: Ages 4 – 7 yrs old
This is a wonderful little book to help your child be comfortable with going to the doctor. It describes and shows many of the things that might happen to them. Your child can see the instruments that a doctor uses to listen to your heart or to look into your ears and eyes. A lot of time your child is fearing the unknown. If you take time to talk and show them what could happen it can put your child at ease. The illustrations will help your child feel better since they can see several smiling children visiting the doctor.


 We Need Doctors (Helpers in Our Community) by Lola M. Schaefer
Reading Level: Ages 3 and up
This is a simple little book that makes a great introduction to doctors. There is just one sentence per page. Each page shows a picture and explains something about doctors. You get information about the jobs they do and the things they need to carry out their work.
Related Posts
Community Helpers – Overview
Dentists: Love to Learn about Community Helpers
Firefighters: Love to Learn About Community Helpers
Police Officers: Love to Learn About Community Helpers
Acknowledgements:

Images for Doctor’s Bag Craft and part of Fun Sheet created by Polliwog Place
http://www.teacherspayteachers.com/Store/Polliwog-Place

Some of the images for the Fun Sheet were created by Charlotte’s Clips
http://www.teacherspayteachers.com/Store/Charlottes-Clips-4150