Love to Laugh and Learn

Fun and interesting learning activities to do with the children in your life

  • Home
  • About Me
  • Attractions
  • Recipes
  • Privacy Policy

Rectangles: Learning Activities for Shapes

January 19, 2013 by Mama Carmody 17 Comments

Rectangles: Learning Activities for Shapes
with Free Printable


Time to have fun with rectangles. You can find rectangles all around you…look at the front door of your house and possibly the windows are rectangles too. Did you know if you put two squares side by side that they will make a rectangle? Try it and see. Have fun with the different crafts, snacks and stories that help you learn more about rectangles.

Content:

Toys
Craft:
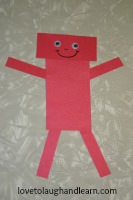
Red Rectangle Robot
Snacks
Story Time
Related Posts

Toys

Here are a few suggestions of toys that might be around your house that are rectangle shaped:
Train track pieces, books, some puzzles are rectangle shaped, pictures in your family photo album, deck of cards, Playful Patterns by Discovery Toys (just use the rectangle shapes for play today)
Leave a comment and tell me what else you found.

(top)

Craft

Have fun learning about rectangles with this Red Rectangle Robot.

Red Rectangle Robot

Materials for Red Rectangle Robot Craft

Materials Needed:

Red Rectangle Robot pattern
Red construction paper or red crayons, markers or paint
Scissors
Glue
Wiggly Eyes
Marker or crayons to draw face

Instructions:

Red Rectangle Robot Pieces

1) Print the Red Rectangle Robot Pattern
2) Either color, paint or use the pieces as a pattern to cut out of red construction paper.
3) If you color or paint the pieces, then cut them out.
4) Now assemble your robot with glue.
5) Add wiggly eyes and draw on mouth and nose.
Now you have a wonderful red rectangle robot.

This craft would also be good when working with the color red or the letter “R”.

Red Rectangle Robot
Red Rectangle Robot


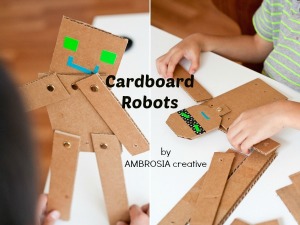
* Another fun way to create this robot would be out of cardboard. I got this idea from Ambrosia Creative. Use my printable and then follow the directions found on Ambrosia Creative. I would suggest adding a tab to the rectangle head to aide in it’s movement and the way it attaches to the body. You will understand what I’m talking about when you look at her directions. Have fun with this additional way to create a rectangle robot. Click on the picture below to head over to her blog.
Learning Activities for Shapes: Cardboard Robot

Foods for snack or meal time

A sandwich cut in half, graham crackers, club crackers, granola bars, cheese or lunch meat cut into rectangular shapes

(top)

Story Time

I See Rectangles (All about Shapes) by D.H. Dilkes
Reading Level: Birth to 4 yrs old
D. H. Dilkes has a great series of little books that discuss different shapes. In this book you will find rectangles all around school. Your child will encounter several items that they will see around school. The text is simple which is great for a young child that is just being introduced to shapes.

Rectangles: The Shape of the World (Bookworms) by Dana Meachen Rau
Reading Level: Birth – 4 yrs old
Dana Meachen Rau has a great series of little books about shapes. In this book you will see several different rectangles. You might find some right in your own house. The simple text and bright pictures will give you and your child a lot to talk about. This is a great little book for introducing rectangles to your child.

Rectangles (Shapes) by Pamela Hall
Reading Level: Birth – 5 yrs. Old
A cute introduction to rectangles. The rhyming storyline leads you through bright illustrations of a kitten and her puppy. They encounter rectangles all around the town. There are many rectangles on each page to be observed, counted and enjoyed.

Rectangles around Town (Shapes Around Town) by Nathan Olson
Reading Level: Ages 4 and up
You will definitely see lots of rectangles all around town. There are so many to find on each page. You will find great illustrations of rectangles. The book even talks about the differences between rectangles and squares. Your child can practice counting how many rectangles they can find on one page.

(top)

Related Posts

Shapes – Overview
The Lessons – Overview
Circles: Learning Activities for Shapes
Ovals: Learning Activities for Shapes
Squares: Learning Activities for Shapes
Triangles: Learning Activities for Shapes
Diamonds: Learning Activities for Shapes
Stars: Learning Activities for Shapes
Hearts: Learning Activities for Shapes
Learning Should Be Fun
Colors – Overview

(top)

Filed Under: Learning Activities, Shapes Tagged With: educational activities, free printable, fun learning, laugh, learn, learning concepts, learning fun, learning opportunities, learning shapes, love, love to laugh, love to laugh and learn, love to learn, making learning fun, printable, rectangles

Love to Learn the Meaning of Candy Canes for Christmas

December 17, 2012 by Mama Carmody 5 Comments

Love to Learn the Meaning of Candy Canes for Christmas


Candy Canes: Although there may not have been any spiritual meaning to the candy cane when it was first introduced, Christians can find many symbols pointing us to Jesus from this simple Christmas treat. Some things to observe (taken, in part, from The History of the Candy Cane):

  1. Shaped like a Shepherd’s staff, which attended Jesus’ birth and Jesus is referred to as the Great Shepherd
  2. Turned upside-down it looks like the letter J for Jesus
  3. The candy is hard like the Solid Rock (Jesus) who is the foundation of the church
  4. The white of the candy represents the purity of Jesus
  5. The red represents His blood that was shed (for more on the candy cane be sure to go to The History of the Candy Cane)

“Teach the children that the cane represents The Shepherd’s staff. The crook on the staff helps bring back sheep that have strayed away from the fold. The candy cane represents the sweetness of giving not only at Christmas time, but also throughout the entire year. The spiral design is a symbol that we are, our brother’s keepers.” (A quote from the story, “Teach the Children the True Meaning of Christmas”)


Crafts
Poem
Snacks
Story Time
Related Posts

Crafts

Candy Canes with Beads and Pipe Cleaners

There are actually a couple of easy crafts to do with pipe cleaners. Have fun making them and decorating your Christmas tree or hanging them around the house. They also make great presents for kids to create and give to grandparents, aunts, uncles or other family and friends.

Materials Needed:  

Materials for Pipe Cleaner Candy Cane Craft


White pipe cleaners
Red pipe cleaners
Red pony beads
White pony beads

Instructions:

1) Choose a pipe cleaner. It doesn’t matter if its red or white.
2) Pick a red bead and put it on the pipe cleaner. Loop the end of the pipe cleaner around this first bead to secure it so it won’t fall off.
3) Now take a white bead and slide it down on top of the red bead. Keep changing colors; next a red then a white, continuing the pattern.

Candy Cane Craft

4) Once you have the pipe cleaner filled, be sure sure to wrap the end of the pipe cleaner around the last bead so it doesn’t fall off.
5) Then bend the top of the pipe cleaner over to make the hook part of the candy cane.
There you go…a beautiful candy cane to decorate with or give as a present.

Finished Candy Cane Craft

Another simple candy cane craft:

1) Take one white and one red pipe cleaner.

Candy Cane Craft with Pipe Cleaners

2) Simply twist them together.

3) Then bend the top of the pipe cleaners over to make the hook part of the candy cane.

Candy Cane Craft with Pipe Cleaners
Candy Cane Pipe Cleaner Craft

(top)

Poem

I suggest giving each child a candy cane or use the pipe cleaner/bead candy cane as you recite the poem below.

Christmas Candy Cane Poem about Jesus

Look at the Candy Cane
What do you see?
Stripes that are red
Like the blood shed for me
White is for my Savior
Who’s sinless and pure!
“J” is for Jesus My Lord, that’s for sure!
Turn it around
And a staff you will see
Jesus my shepherd
Was born for Me!

(Poem found on ministry-to-children.com)

(top)

Foods for snack or meal time

I usually have a list of foods that would be great for snacks or meals but this topic makes for a rather limited variety of foods BUT I did find a great post, by Barbara Shelby. She has several ideas of things you can do with candy canes other than just eat them. For example, use them as stir sticks or smash them into pieces and use them in your favorite recipes. She even suggests crushing them into a fine powder and using them as a flavored sugar. For more detailed ideas go to her post, “Candy Canes and Peppermint Candy Ideas”.

Another fun way to incorporate candy canes into your meal time would be to make your child a Bento lunch. Bento meals are something new to me (thanks Pinterest). They are common in Japanese cuisine. One style of Bento meal is decorated to look like people, animals, buildings and monuments, or items like plants (or candy canes). Here are a few links to blogs that have candy cane bento meals. Maybe they will inspire you:

Candy Cane Bento by Glory’s Mischief
Candy Cane by Bento-logy
Bento Lunch: Candy Cane Cheese by Bento School Lunches

(top)

Story Time

  The Legend of the Candy Cane by Lori Walburg
Reading Level: 6 and up
This is a sweet story about a stranger that comes to a small town to open a store. The mayor hoped it was a doctor. The ladies hoped it was a tailor that would make beautiful dresses. The farmers hoped the man was a trader that would exchange their grain for goods. Can you guess what the children were hoping the store was? Yes, they were wishing for a candy store and their wish came true. The man had a strange candy that they hadn’t seen before. It had red and white stripes and it hooked on the end. Do you know what kind of candy it was? Read the story to find out more about this wonderful candy and its special meaning for Christmas.
**I put the reading level at 6 years old and above because one of the things the story talks about is Jesus dying on the cross and the red blood that He shed. I believe it is appropriate but I wanted to make sure you were aware of this part of the story. I read the story to my 4 and 5 year old preschool class but I was teaching at a Christian preschool.

(top)

Related Posts

The Santa Claus Debate
The True Meaning of Christmas
The Christmas Star
Christmas Angels to Laugh and Learn With
Love to Learn About the Nativity
Review – Christmas on Monument Circle, Indianapolis

(top)


Save

Save

Save

Filed Under: Christmas, Holidays Tagged With: Candy Cane, Candy Canes, christmas, Christmas symbols, December, educational activities, fun learning, holiday, holidays, laugh, learn, love, love to laugh, love to laugh and learn, love to learn, making learning fun

Review – Christmas on Monument Circle Indianapolis

December 10, 2012 by Mama Carmody 11 Comments

It has been several years since we headed downtown to check out the huge “Christmas tree” and decorations on Monument Circle, Indianapolis. We usually just drive around the circle, take in the sights and then move on. I am not a fan of the one way streets, the crowds and the parking situations so driving through is enough for me. But since it was 60 degrees outside, on this December 1st, and I wanted to gather information for my readers I grabbed my camera and we headed downtown for an adventure.

We did have trouble finding a parking spot and the closer you got to the Circle the worse the traffic was but we finally found an empty parking meter. Since it was after 9:00 p.m. we didn’t have to pay so that was nice.

The “tree” was just as wonderful as I remembered it but I don’t know that it was worth parking and walking around the monument. There really wasn’t a lot there. Of course there was the tree, the large toy soldiers and sailors that stood along the edge of the monument and the beautiful Nativity scene in front of Christ Church Cathedral. I believe I would have enjoyed it just as much from my car window.

Christmas Tree at Monument Circle Indianapolis

I did find two reasons that you might want to get out of the car and walk around the Circle: The Rocket Fizz Soda Pop and Candy Shop and The Chocolate Café – The South Bend Chocolate Company. Both shops were open late on Saturday evening and had plenty of tasty treats to offer.

Since I like to include a little fun learning in my activities I wanted to share a few interesting facts I found in an article by Julie Sickel, a writer with the Indianapolis Star. The title of the article is “Here are 50 Facts Relating to the Long-Running Holiday Tradition”. I am going to list a few of my favorite facts but you should read the article to find the rest of them.

1. More than six miles of electrical wire and more than two miles of garland are used for the Circle of Lights.

2. There are 52 strands with 4,784 colored lights strung from the top of the monument to its base.

3. The colors of the bulbs represent different branches of the U.S. military: green for the Army, clear for the Air Force, blue for the Navy, yellow for the Coast Guard and red for the Marines.

4. There are 26 12-foot-tall toy soldiers and sailors and 26 10-foot-tall peppermint sticks surrounding the Circle. (This would be a great counting opportunity for your kids)

5. The ceremony’s most revered annual guest is Santa Claus, who arrives after the lights are switched on.

6. The switch to light the Monument is flipped by a child 12 or younger.

7. For more than two decades, the lucky child has been chosen through a coloring contest.

8. At 284 feet tall, the Soldiers and Sailors Monument is about 21 feet shorter than the Statue of Liberty and 16 feet short of a football field.

9. The Soldiers and Sailors Monument is the largest in the nation to be dedicated to the common soldier.

10. The 38-foot-tall bronze figure atop the statue is named “Victory” but also is called “Miss Indiana” by Hoosiers. She faces south to welcome soldiers returning from battle.

Here is a fun observation my daughter made when she was about 10 years old and I still see it every time we go to see the Christmas lights. (I’m going to give you some hints before I tell you what we actually saw. I want to give you a chance to see if you see the same thing we did.)

  • As we drove towards the Circle my daughter kept saying that she saw a certain character from the Rudolph the Red-Nosed Reindeer television special created by Rankin/Bass. I looked all around and couldn’t find it. I thought it was a character at the foot of the tree or in a store window. As it turns out, it was an illusion created by looking at the monument through the lights. Take a look at the picture below and see if you can figure out what character we see. Leave a comment as to who you think it is. Once you have made your guess you can click on the picture to see who the character is that we see.
Do you see a character from Rudolph the Red-Nosed Reindeer?

If you don’t see what we saw, then click on the picture below. I have created an overlay of the character on the portion of the monument that we saw it. See if that helps you see it when you look back at the Monument picture.

Do you see a character from Rudolph the Red-Nosed Reindeer?

So can you see him too or do my daughter and I just have vivid imaginations? If you take a drive downtown to look at the lights please leave a comment and let me know if you saw him. We usually see him as we are driving towards the Circle not once we are really close to it. Have fun enjoying the sights, lights and fun this holiday season.

You might also like:

Review: Christmas at the Indianapolis Zoo

Filed Under: Christmas, Holidays, Reviews Tagged With: christmas, December, family friendly, family friendly activities, family friendly events, holiday, holidays, Indiana, Indianapolis, laugh, learn, love, love to laugh, love to laugh and learn, love to learn, Monument Circle, santa, santa claus, tree of lights

Squares: Learning Activities for Shapes

November 26, 2012 by Mama Carmody 10 Comments

Squares: Learning Activities for Shapes

Below you will find some fun learning activities with squares. Your child can make a travel pillow or a gift for some special lady in their life. There are also some great book suggestions. You can find squares all around you. What type of squares did you and your child find?

Content:

Toys
Crafts:
Square Travel Pillow
Square Sachet
Snacks
Story Time
Related Posts

Toys

Square wooded blocks, dice, some game boards

(top)

Crafts

Learn about squares while making travel pillows and sachets.

Square Travel Pillow

Materials Needed for Square Pillow Craft

Materials Needed:

Fleece
Ruler
Scissors
Fabric glue or yarn & plastic yarn sewing needle
Fiber filling

Instructions:

1) Cut the fleece into two 8 inch squares for each pillow. *I chose 8 inches because my great-niece and great-nephews still ride in car seats and I thought the smaller pillow would work better to prop up their heads rather than a bigger one. You can actually make them any size square you want.  

Square pieces of fabric

2) For younger children that are doing this craft; help them run a bead of fabric glue along the outer edge of three sides of the wrong side of one of the squares. *The wrong side would be the back side that doesn’t have a clear print on it. (For older children skip down to step 2b)

Glue bead

3) Place the second square on top of the one with the glue; wrong sides together. According to the directions on the Aleene’s Fabric Fusion, let it dry for 2 to 4 hours.

4) Stuff with fiber filling. A child as young as one year old can help with this step.

Stuffing Pillow

5) Glue the last side together. You may need to use straight pins or safety pins to hold it closed until it has dried.

Sealing last side of square pillow

**2b) For older children, you can teach them how to sew the two squares together using yarn and a plastic yarn needle. I used to sew with my 4 year old preschool classes.

Plastic yarn sewing needle

3b) Place the two squares with wrong sides together.

4b) Thread yarn through needle then sew 3 of the 4 sides together using a straight stitch.

Sewing pillow together

5b) Stuff with fiber filling then sew the last side together. Even little ones as young as one year old can help with this step.

Stuffing Pillow

6b) Sew last side closed.

Now your little one has created their own special pillow to use in the car.

Square Travel Pillows

**Special note: You may want to take your plastic yarn needle to the store when you choose your fleece. Some of the fleece is woven tighter than others which makes it hard to get the needle through it. I couldn’t get the needle through the purple fleece but it went easily through the fleece with the frogs.

(top)

Square Sachet Bags

Materials Needed for Sachets

Materials Needed:

Fleece
Ruler
Scissors
Fabric glue or yarn & plastic yarn sewing needle
Potpourri of your choice

Instructions:

1) Cut the fleece into two 4 inch squares for each sachet.

2) For younger children that are doing this craft; help them run a bead of fabric glue along the outer edge of three sides of the wrong side of one of the squares. *The wrong side would be the back side that doesn’t have a clear print on it. (For older children skip down to step 2b)

3) Place the second square on top of the one with the glue; wrong sides together. According to the directions on the Aleene’s Fabric Fusion, let it dry for 2 to 4 hours.

4) Fill with potpourri of your choice. A child as young as one year old can help with this part. Make sure they don’t try to eat the potpourri.

Filling Square Sachet

5) Glue the last side together. You may need to use straight pins or safety pins to hold it closed until it has dried.

Sealing Square Sachet

**2b) For older children, you can teach them how to sew the two squares together using yarn and a plastic yarn needle. I used to sew with my 4 year old preschool classes.

3b) Place the two squares with wrong sides together.

4b) Thread yarn through needle then sew 3 of the 4 sides together using a straight stitch.

5b) Fill with potpourri then sew the last side together.

Your child has now made a special gift that they can give to mom, grandma, teacher or some other special lady in their life. Or maybe they want to keep it to put in one of their own clothes drawers.

Square Sachet

(top)

Foods for snack or meal time

Square crackers, square pieces of cheese, caramels, cut sandwiches into square shapes, cut fruit into little squares, Chex cereal

(top)

Story Time

I See Squares by D. H. Dilkes
Reading Level: Birth – 4 yrs old
D. H. Dilkes has a great series of little books that discuss different shapes. In this book you will find squares in many different places. I like the fact that the illustrations are photographs of every day items. The text is simple which is great for a young child that is just being introduced to shapes.

So Many Circles, So Many Squares by Tana Hoban (only covers circles and squares)
Reading Level: Birth to 2nd Grade
There is no storyline to this book. It is just pages and pages of pictures from the world around us. It concentrates on two shapes; circles and squares. This is a great book for introducing shapes to your child. This book could lead into a great game of finding circles right where you are.

Squares (Shapes) by Pamela Hall
Reading Level: Birth to 5 yrs old
A cute introduction to squares. The rhyming storyline leads you through bright illustrations of a kitten and her puppy. They encounter squares all around the house. There are many squares on each page to be observed, counted and enjoyed. I do have a problem with the fact that some of the squares are positioned on their corner which then makes them look like a diamond.

What Is Square? by Rebecca Kai Dotlich
Reading Level: Ages 1 – 4 yrs old
I really like this book because it concentrates on one shape. I am finding it hard to find shape books that are dedicated to one shape at a time. This book is written in a fun rhyming fashion. There are plenty of pictures of square items. One thing that bothers me is that some of the square items are set at an angle (in other words on a corner) which then makes them look like a diamond instead of a square. On a positive note, that gives you an opportunity to start discussing the diamond shape.

(top)

Related Posts:

Shapes – Overview
The Lessons – Overview
Circles: Learning Activities for Shapes
Ovals: Learning Activities for Shapes
Rectangles: Learning Activities for Shapes
Triangles: Learning Activities for Shapes
Diamonds: Learning Activities for Shapes
Stars: Learning Activities for Shapes
Hearts: Learning Activities for Shapes
Learning Should Be Fun
Colors – Overview

(top)

Filed Under: Learning Activities, Shapes Tagged With: educational activities, fun learning, laugh, learn, learning, learning concepts, learning fun, learning opportunities, learning shapes, lessons, love, love to laugh, love to laugh and learn, love to learn, making learning fun, square, squares

Review: Conner Prairie with Young Children

October 5, 2012 by Mama Carmody 11 Comments

Back in February, a friend and her 2 year old accompanied me to Conner Prairie Interactive History Park. I was interested in finding out what types of activities there might be for very young children. We were very pleased with the amount of interesting things there were to keep a young child happy and entertained. In February, most of the outside exhibits are closed but we still found plenty to do. Please check out my review Review: Conner Prairie on President’s Day (with a 2 yr old).

This past weekend, Saturday, September 29, 2012, my niece and I decided to take two 1 year olds and one 3 year old to Conner Prairie. We were taking advantage of the free admission offered by Smithsonian Magazine  We had a wonderful time and we again found plenty for little ones to do but there were a few things we had not considered. I am going to share with you some of the successes and challenges of our day.

Our first challenge…we were out-numbered. Two adults with three very young children kept us on our toes. Our second challenge; we should have used a wagon instead of strollers. It took so much time buckling and unbuckling kids from strollers that we ended up bypassing a lot of things we were interested in. We did see a really neat fold-up wagon that someone was using. I came home and found one on Amazon.com (EasyGoWagon). I currently have it on my wish list for a future purchase.

Another problem with the day was that we didn’t really consider how many things that we were excited to see and do that very young children would have no interest in. It had been so long since my niece and I had been to Conner Prairie that we were just anxious to get there and experience it all again. We didn’t consider that the children really wouldn’t care about looking around in an old house or seeing a blacksmith at work. We decided early in the day that we were going to make another trip, for adults only, sometime in the near future.

So as not to leave you thinking we didn’t enjoy our time at Conner Prairie, let me share with you all the fun things we found to do with the little ones.  Of course, they loved Animal Encounters. There were so many young animals for the children to see and touch.

Conner Prairie Animal Encounters

There were even two week old baby goats. This was one of the places that got a little scary since the adults were out-numbered. Our little ones wanted to go in every direction at once and we were kept hopping trying to keep them within sight and arms reach at all times.

Our next stop was the Lenape Indian Camp. This is one of the spots that if the children had been in a wagon we would have let them out to run around a bit but we had just gotten them strapped back in the strollers from the Animal Encounters. When I was here in February, the 2 yr old we had with us loved running in and out of the huts.

We walked the entire grounds, even though we didn’t go in very many of the buildings. We did stop in the blacksmith’s shop. Although the children didn’t get a lot out of it, they sat very quietly and watched while my niece and I listened for a little bit. We took time to walk through one of the houses. The most exciting part for the kids was the water pump outside the house.

Conner Prairie: Pumping Water
Conner Prairie: Still Pumping Water
Conner Prairie: Pumping Water is Hard Work

We spent several minutes there while my 3 yr old great-niece pumped water…


…and the two 1 yr old boys played in it.

Conner Prairie: Playing in Water
Conner Prairie: Boys playing in Water

The other big hit of the day was the River Crossing Play Area. You definitely need to bring an extra change of clothes if you are going to spend time outside at the water area. There is a replica of a steamboat for the children to climb on but the big hit was the water play table. Let me explain; this water play table isn’t one of those small tables you might find in a preschool or kindergarten classroom. This thing was the center of the whole exhibit. It was huge. Water ran from the top of it down several levels. You could put up barricades to build a dam to stop or redirect the water. My 3 yr old great-niece and I put up a few walls for the dam. My two great-nephews just enjoyed splashing and playing in the water as much as they could.

Conner Prairie: River Crossing Play Area

They were soaked by the time they were finished. Thank goodness it was a warm day and we had a change of clothes for each of them.

There was also an indoor area for play at the River Crossing. It is a civil war themed area with trains…

Conner Prairie: Playing with Trains

…pieces to build a Playmobil fort with soldiers and a great climbing area. The boys were too small for the climbing area but my great-niece loved it.

Conner Prairie: Fort River Crossing

Even with the several challenges, that we didn’t think of in advance, we had a very good day. The children were very well behaved and enjoyed the activities that we presented them. We got there just after they opened at 10:00 a.m. and didn’t leave until after 2:00, so we found plenty of things to do with small children.

Here is some advice if you are planning a day at Conner Prairie with very young children:

1) Take a wagon instead of strollers for an easier way to get children in and out quickly to enjoy the different experiences.

2) If your children are under 3 yrs old, make sure the adults aren’t out-numbered by the children.

3) Don’t expect to get to enjoy the full experience of Conner Prairie because little ones cannot handle much of the history part of the experience so….

4) ….plan another trip to Conner Prairie very soon; just for adults!

Related Posts:

Review: Conner Prairie on President’s Day (with a 2 yr old)
Learning Should Be Fun
The Lessons – Overview
Colors – Overview

Filed Under: Reviews Tagged With: attractions, Conner Prairie, educational activities, family friendly, family friendly activities, family friendly events, laugh, learn, love, love to laugh, love to laugh and learn, love to learn, making learning fun

  • « Previous Page
  • 1
  • 2
  • 3
  • 4
  • 5
  • Next Page »

Don’t Miss This Great Book

Categories

  • Articles
  • Attractions and Events
  • Autumn/Fall
  • Children's Books
  • Christmas
  • Coloring Pages
  • Colors
  • Community Helpers
  • Contest
  • Cooking with Kids
  • eBundles
  • Free Printables
  • Gardening
  • Halloween
  • Holidays
  • Learning Activities
  • Music
  • Reviews
  • Sensory Bins
  • Shapes
  • Thanksgiving
  • Uncategorized

Follow Me on Bloglovin

Follow on Bloglovin

Recent Posts

  • Yes, You Can Eat Raw Pumpkin! Try My Fall Harvest Fruit Salad
  • Zombie Zapper Brain Boost Smoothie
  • Learning Fun at Disney: The Importance of Imagination
  • Learning Fun at Disney: Manners
  • How to Eat A Pumpkin: A Lesson From a 3 Year Old
  • How to Eat a Pumpkin, Part 2
  • Pumpkins are Orange; and Other Learning Concepts
  • Love to Laugh and Learn at the Apple Orchard

Check This Out

Holiday Toy List – STEM Toys

Books

US Family Guide

USFamilyGuide.com

Recent Comments

  • Mama Carmody on Your Favorite Childhood Book
  • Lisa Smiley on Your Favorite Childhood Book
  • Harlow's Harvest on Eggs in a Nest: Cooking with Kids

Copyright © 2026 · Lifestyle Pro Theme on Genesis Framework · WordPress · Log in